本文将介绍如何在 Ubuntu 22.04 上安装并配置 ELK 栈中的 Elasticsearch 与 Kibana,包括安全配置(用户与密码)、防火墙放行端口、Kibana 中文化等完整过程。
一、准备工作
在开始之前,确保服务器环境满足以下条件:
操作系统:Ubuntu 22.04 / Debian 12 / CentOS 7+
JDK 环境:OpenJDK 11+(Elasticsearch 需要)
系统资源:建议 4G 内存以上,20G 磁盘空间
网络环境:能够访问外网,用于下载软件包
二、安装 Elasticsearch
正确添加 Elastic 8.x 源(适用于 Ubuntu 20.04/22.04)
导入 Elastic GPG key
curl -fsSL https://artifacts.elastic.co/GPG-KEY-elasticsearch | sudo gpg --dearmor -o /usr/share/keyrings/elasticsearch-keyring.gpg
添加 APT 源:
echo "deb [signed-by=/usr/share/keyrings/elasticsearch-keyring.gpg] https://artifacts.elastic.co/packages/8.x/apt stable main" | sudo tee /etc/apt/sources.list.d/elastic-8.x.list
更新并安装Elasticsearch:
sudo apt update
sudo apt install elasticsearch -y
启用并启动服务
sudo systemctl enable elasticsearch
sudo systemctl start elasticsearch
验证安装(如果忘了密码,可以执行下列命令重置密码)
curl -k https://localhost:9200 -u elastic:默认密码

sudo /usr/share/elasticsearch/bin/elasticsearch-reset-password -u elastic
三、安装 Kibana
安装 Kibana
sudo apt-get install kibana -y
修改 Kibana 配置文件(一般在 /etc/kibana/kibana.yml)初始化(Kibana)时使用:
server.host: "0.0.0.0"
elasticsearch.hosts: ["https://localhost:9200"]
elasticsearch.username: "elastic"
elasticsearch.password: "xxxxxx"
elasticsearch.ssl.verificationMode: "none"
启动 Kibana
sudo systemctl start kibana启动之后修改配置文件(/etc/kibana/kibana.yml)覆盖原来的账号密码
server.port: 5601
server.host: "0.0.0.0"
elasticsearch.hosts: ["https://localhost:9200"]
elasticsearch.username: "kibana_system"
elasticsearch.password: "xxxxxxx"


//下面命令是设置或重置KIbanan内置服务连接elastic服务的普通用户的账号密码
curl -k -u elastic:<elastic密码> -X POST "https://localhost:9200/_security/user/xxxx" \
  -H "Content-Type: application/json" -d '{
    "password": "xxxxxxx",
    "roles": ["superuser"],
    "full_name": "xxxx"
}'
重新启动 Kibana
sudo systemctl enable kibana
sudo systemctl restart kibana
防火墙开放 5601 端口并转发外部流量到服务器的514端口->1514端口(本地服务器选用方法一即可)
方法一:
sudo ufw allow 5601/tcp
# 将进入服务器的 TCP/UDP 514 端口流量转发到本机的 1514 端口
iptables -t nat -A PREROUTING -p tcp --dport 514 -j REDIRECT --to-port 1514
iptables -t nat -A PREROUTING -p udp --dport 514 -j REDIRECT --to-port 1514
iptables -t nat -L -n -v
方法二:DNAT(适用于网关或需要转发到指定内网 IP)
如果这台机器是网关/防火墙,流量需要转发到某台后端服务器:
# 假设后端 syslog 服务器 IP 是 192.168.1.100
iptables -t nat -A PREROUTING -p tcp --dport 514 -j DNAT --to-destination 192.168.1.100:1514
iptables -t nat -A PREROUTING -p udp --dport 514 -j DNAT --to-destination 192.168.1.100:1514
# 允许转发
iptables -A FORWARD -p tcp -d 192.168.1.100 --dport 1514 -j ACCEPT
iptables -A FORWARD -p udp -d 192.168.1.100 --dport 1514 -j ACCEPT
访问测试,打开浏览器访问:
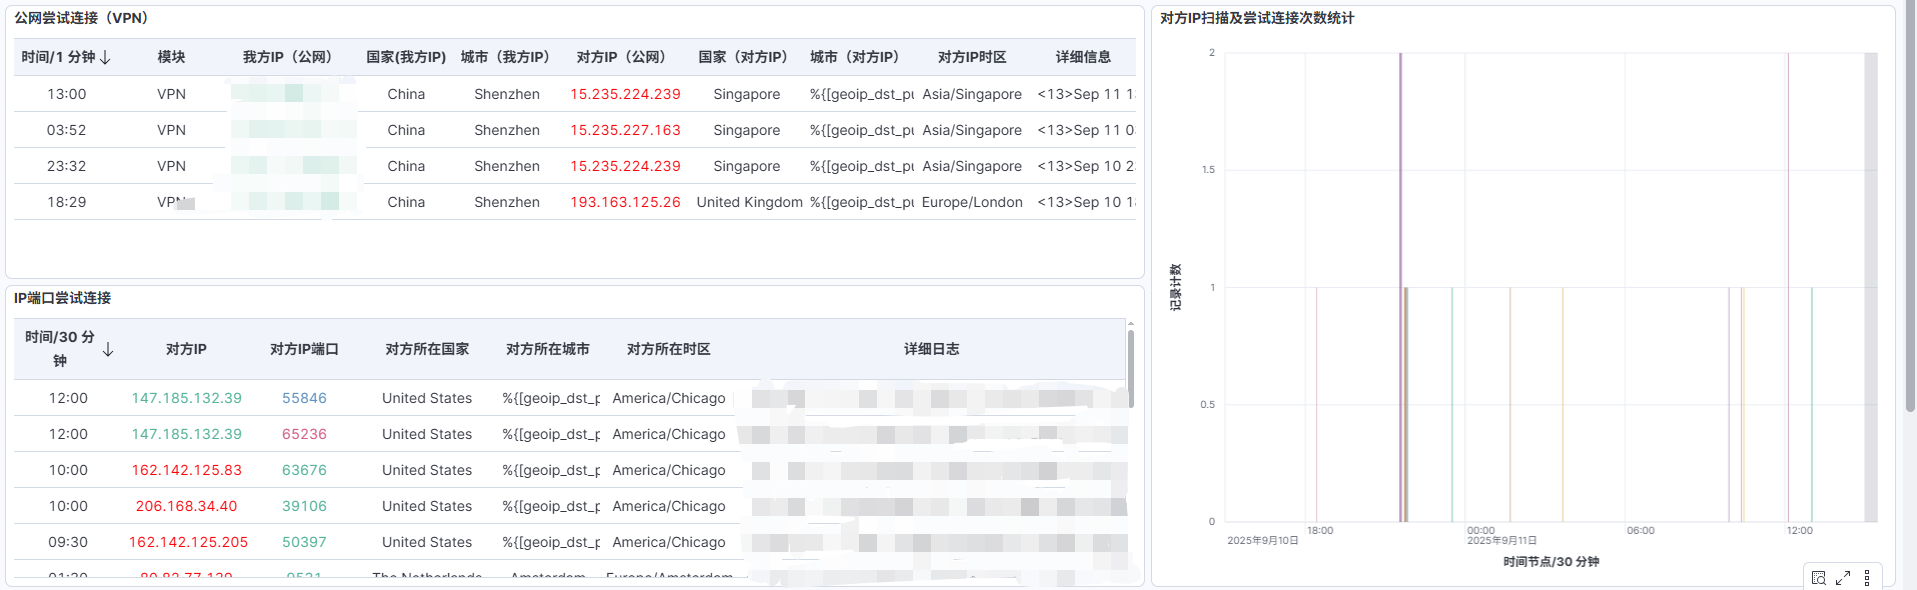
https://服务器IP:5601四、安装 Logstash
编写收集日志的syslog.conf
sudo apt install logstash -y
sudo systemctl enable logstash


//配置logstash管道conf
cat <<'EOF' > /etc/logstash/conf.d/xxxx.conf
# /etc/logstash/conf.d/xxxx.conf
input {
  udp {
    port => 1514
    type => "xxxx-syslog"
  }
}

filter {
  #################################################
  # 1. 解析 syslog 基础结构
  grok {
    match => {
      "message" => "<%{NUMBER:syslog_pri}>%{SYSLOGTIMESTAMP:syslog_timestamp} %{YEAR:syslog_year} %{HOSTNAME:device} %{WORD:module}:?%{GREEDYDATA:msg_content}"
    }
  }

  #################################################
  # 2. 用 syslog_timestamp + syslog_year 转换 @timestamp
  mutate {
    add_field => { "syslog_timestamp_full" => "%{syslog_timestamp} %{syslog_year}" }
  }

  date {
    match => [ "syslog_timestamp_full", "MMM dd HH:mm:ss YYYY" ]
    timezone => "Asia/Shanghai"
    target => "@timestamp"
  }

  mutate {
    remove_field => [ "syslog_timestamp_full", "syslog_year", "syslog_timestamp" ]
  }

  #################################################
  # 3. 匹配日志内容
  grok {
    match => { "msg_content" => "no IKE config found for %{IP:src_ip_ike}\.\.\.%{IP:dst_ip_ike},recommend to check the remote/local ip" }
    tag_on_failure => []
  }

  grok {
    match => { "msg_content" => "CHILD_SA %{WORD:sa_name}\{\d+\} (已建立|established) with SPIs %{DATA:in_spi}_i %{DATA:out_spi}_o and TS %{IP:src_subnet}/%{NUMBER:src_mask} === %{IP:dst_subnet}/%{NUMBER:dst_mask}" }
    tag_on_failure => []
  }

  grok {
    match => { "msg_content" => "Connection closed to %{IP:dst_ip_closed}, port %{NUMBER:dst_port} \(%{DATA:reason}\)" }
    tag_on_failure => []
  }

  #################################################
  # 4. 区分公网/内网
  ruby {
    code => "
      require 'ipaddr'
      private_ranges = [
        IPAddr.new('10.0.0.0/8'),
        IPAddr.new('172.16.0.0/12'),
        IPAddr.new('192.168.0.0/16')
      ]

      src_ip = event.get('src_ip_ike') || event.get('src_subnet')
      if src_ip
        if private_ranges.any?{|r| r.include?(IPAddr.new(src_ip))}
          event.set('src_ip_private', src_ip)
        else
          event.set('src_ip_public', src_ip)
        end
      end

      dst_ip = event.get('dst_ip_ike') || event.get('dst_subnet') || event.get('dst_ip_closed')
      if dst_ip
        if private_ranges.any?{|r| r.include?(IPAddr.new(dst_ip))}
          event.set('dst_ip_private', dst_ip)
        else
          event.set('dst_ip_public', dst_ip)
        end
      end
    "
  }

  #################################################
  # 5. GeoIP 解析(仅公网)
  if [src_ip_public] {
    geoip {
      source => "src_ip_public"
      target => "geoip_src_public"
      database => "/usr/share/GeoIP/GeoLite2-City.mmdb"
	  ecs_compatibility => disabled
      tag_on_failure => []
    }
  }

  if [dst_ip_public] {
    geoip {
      source => "dst_ip_public"
      target => "geoip_dst_public"
      database => "/usr/share/GeoIP/GeoLite2-City.mmdb"
	  ecs_compatibility => disabled
      tag_on_failure => []
    }
  }

  #################################################
  # 6. 生成 geo_point 字段(数组形式)
  ruby {
    code => '
      if event.get("[geoip_src_public][location]")
        lon = event.get("[geoip_src_public][location][lon]")
        lat = event.get("[geoip_src_public][location][lat]")
        event.set("[geo_source][location]", [lon.to_f, lat.to_f]) if lat && lon
      elsif event.get("[geoip_src_public][latitude]") && event.get("[geoip_src_public][longitude]")
        lat = event.get("[geoip_src_public][latitude]")
        lon = event.get("[geoip_src_public][longitude]")
        event.set("[geo_source][location]", [lon.to_f, lat.to_f])
      end

      if event.get("[geoip_dst_public][location]")
        lon2 = event.get("[geoip_dst_public][location][lon]")
        lat2 = event.get("[geoip_dst_public][location][lat]")
        event.set("[geo_destination][location]", [lon2.to_f, lat2.to_f]) if lat2 && lon2
      elsif event.get("[geoip_dst_public][latitude]") && event.get("[geoip_dst_public][longitude]")
        lat2 = event.get("[geoip_dst_public][latitude]")
        lon2 = event.get("[geoip_dst_public][longitude]")
        event.set("[geo_destination][location]", [lon2.to_f, lat2.to_f])
      end
    '
  }

  #################################################
  # 7. 地图展示字段
  if [src_ip_public] {
    mutate {
      replace => {
        "[geo_source][ip]" => "%{src_ip_public}"
        "[geo_source][country]" => "%{[geoip_src_public][country_name]}"
        "[geo_source][city]" => "%{[geoip_src_public][city_name]}"
      }
    }
  }
  if [dst_ip_public] {
    mutate {
      replace => {
        "[geo_destination][ip]" => "%{dst_ip_public}"
        "[geo_destination][country]" => "%{[geoip_dst_public][country_name]}"
        "[geo_destination][city]" => "%{[geoip_dst_public][city_name]}"
      }
    }
  }

  #################################################
  # 8. 清理多余字段
  mutate {
    remove_field => [
      "[geoip_src_public][latitude]", "[geoip_src_public][longitude]",
      "[geoip_dst_public][latitude]", "[geoip_dst_public][longitude]"
    ]
    remove_tag => ["_rubyexception", "_geoip_lookup_failure"]
  }
}

output {
  elasticsearch {
    hosts => ["https://localhost:9200"]
    user => "elastic"
    password => "xxxxxxxx"
    index => "siyi-syslog-%{+YYYY.MM.dd}"
    ssl_enabled => true
    ssl_verification_mode => "none"
  }

  # 只要有公网 IP,就额外写入 geo 索引
  if [src_ip_public] or [dst_ip_public] {
    elasticsearch {
      hosts => ["https://localhost:9200"]
      user => "elastic"
      password => "xxxxxxxx"
      index => "siyi-geomap-%{+YYYY.MM.dd}"
      ssl_enabled => true
      ssl_verification_mode => "none"
      manage_template => false
      data_stream => false
    }
    stdout { codec => rubydebug { metadata => true } }
  }
}
EOF

在ela服务器用命令配置索引模板(内外网VPN及地图可视化)
curl -u elastic:xxxxxxxxxxx -X PUT "https://localhost:9200/_index_template/xxxx-complete-template" \
-H "Content-Type: application/json" -k -d '{
  "index_patterns": ["xxxxx-syslog-*", "xxxxx-geomap-*"],
  "template": {
    "mappings": {
      "properties": {
        "@timestamp": {
          "type": "date"
        },
        "syslog_pri": {
          "type": "integer"
        },
        "msg_content": {
          "type": "text"
        },
        "reason": {
          "type": "keyword"
        },
        "module": {
          "type": "keyword"
        },
        "device": {
          "type": "keyword"
        },
        "src_ip": {
          "type": "ip"
        },
        "dst_ip": {
          "type": "ip"
        },
        "src_ip_private": {
          "type": "ip"
        },
        "dst_ip_private": {
          "type": "ip"
        },
        "src_ip_public": {
          "type": "ip"
        },
        "dst_ip_public": {
          "type": "ip"
        },
        "geoip_src_public": {
          "properties": {
            "ip": { "type": "ip" },
            "country_name": { "type": "keyword" },
            "country_code2": { "type": "keyword" },
            "city_name": { "type": "keyword" },
            "continent_name": { "type": "keyword" },
            "location": { "type": "geo_point" },
            "timezone": { "type": "keyword" },
            "subdivisions": {
              "properties": {
                "iso_code": { "type": "keyword" },
                "names": {
                  "properties": {
                    "en": { "type": "keyword" },
                    "zh-CN": { "type": "keyword" }
                  }
                }
              }
            }
          }
        },
        "geoip_dst_public": {
          "properties": {
            "ip": { "type": "ip" },
            "country_name": { "type": "keyword" },
            "country_code2": { "type": "keyword" },
            "city_name": { "type": "keyword" },
            "continent_name": { "type": "keyword" },
            "location": { "type": "geo_point" },
            "timezone": { "type": "keyword" },
            "subdivisions": {
              "properties": {
                "iso_code": { "type": "keyword" },
                "names": {
                  "properties": {
                    "en": { "type": "keyword" },
                    "zh-CN": { "type": "keyword" }
                  }
                }
              }
            }
          }
        },
        "geo_source": {
          "properties": {
            "ip": { "type": "ip" },
            "country": { "type": "keyword" },
            "city": { "type": "keyword" },
            "province": { "type": "keyword" },
            "location": { "type": "geo_point" }
          }
        },
        "geo_destination": {
          "properties": {
            "ip": { "type": "ip" },
            "country": { "type": "keyword" },
            "city": { "type": "keyword" },
            "province": { "type": "keyword" },
            "location": { "type": "geo_point" }
          }
        }
      }
    }
  }
}'
五、为 Kibana创建(web端)管理员用户
curl -u elastic:旧密码 -X POST "https://localhost:9200/_security/user/admin_user" \
-H "Content-Type: application/json" -d '{
  "password" : "xxxxx",
  "roles" : ["superuser"],
  "full_name": "xxxx"
}' -k
登录Kibana,使用https://ip:5601 登录 Web 界面。


六、总结
至此,ELK 已完成基本安装与配置,Kibana 也支持中文界面。
安装思路可以总结为:
安装核心服务:Elasticsearch + Kibana
配置安全认证:修改系统用户密码、新建管理员用户
开放服务访问:防火墙放行 5601 端口
优化用户体验:切换 Kibana 中文界面
Kibana 默认是英文界面,不过 Elastic 官方已经支持多语言,其中包括简体中文。你可以通过配置和插件方式切换。
在配置文件 /etc/kibana/kibana.yml 里加一行:
i18n.locale: "zh-CN"保存后,重启 Kibana:
sudo systemctl restart kibana这样登录 Kibana 就会显示中文界面。
通过以上步骤,你就可以在企业环境中快速搭建 ELK 平台,并提供友好的中文界面,方便日常运维与日志分析工作。
.jpg)